Swift Data: A New Era of Data Handling in Swift UI
Ever since humans started persisting data, it has been seen as an almost insurmountable task. Even SwiftUI, in all its glory, hasn't managed to fully solve this problem... yet. But with the introduction of Swift Data, those daunting times might be over for good, heralding a new golden age of easy data handling. Let's evaluate Apple's new Swift Data framework to see how good it really is.
Creating the @Model
Before we dive into persisting data, we need to define what this data will look like. Swift Data simplifies this process. Instead of fussing with tables or entities, all we need to do is create an object.
@Model
final class Person {
	var firstName: String
	var lastName: String
	var birthday: Date

	init(firstName: String, lastName: String, birthday: Date = .now) {
		self.firstName = firstName
		self.lastName = lastName
		self.birthday = birthday
	}
}

extension Card: Identifiable { ... }

extension Card: Hashable { ... }
Nothing too unusual here. However, the secret lies in the new @Model macro. The newly created Person class behaves much like an ObservableObject, with the small but significant addition that it is now preservable. Marking a class with the new @Observable macro automatically publishes all attributes in the class. Thus, when they change, they also update the UI.
We can now use this newly created Model in one of our views.
struct Profile: View {
	@Bindable var person: Person

	var body: some View {}
}
Note the use of the new @Bindable macro, which behaves much like the familiar @State, in that it updates the view when any value changes.
Reading and Writing Data in SwiftData
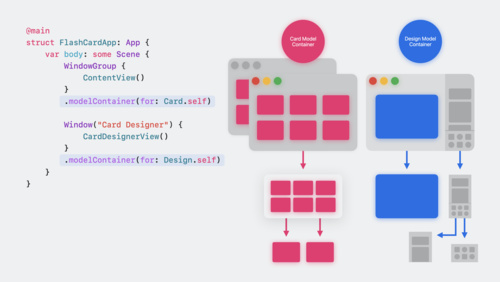
Now that we've set the stage, it's time to delve into the main event: persisting the data. First, we need to ensure our view is aware of the context in which we want to store the data. In this case, we need only one context, but your app can have as many as you require. Applying the .modelContainer modifier to the WindowGroup isn't necessary; you can also do it further down the view hierarchy.
Here's an example where each window within the WindowGroup accesses the same context for reading and writing data. If you have multiple window groups, you could provide a different context for each, and they will never interfere with each other. Just ensure you provide the DataType you want to read and write from. In our case, it's Person.
import SwiftUI
import SwiftData

@main
struct BirthdayList: App {
	var body: some Scene {
		WindowGroup {
			ContentView()
		}
		.modelContainer(for: Person.self)
	}
}
With everything set up, it's time to persist our data in the ContentView. We have two tasks to perform:
- Query the data using the
@Querymacro: You can use this standalone, or for basic sorting and filtering when fetching data. - Retrieve the modelContext from the environment: As we've applied the modelContainer modifier to the entire window group, each child view can directly access it using the
@Environmentmacro.
Next, we loop over the people array and display the first and last names of our "birthday besties".
struct ContentView: View {
	@Query(sort: \.birthday) private var people: [Person]
	@Environment(\.modelContext) private var modelContext

	var body: some View {
		ForEach(people, id: \.self) { person in
			Text("\(person.firstName) \(person.lastName)")
		}

		Button("Add person") {
			let newPerson = Person(firstName: "Tim", lastName: "Apple")
			modelContext.insert(newPerson)
		}
	}
}
Thanks to Swift Data, writing is as straightforward as reading. Simply create a new person using our model and call modelContext.insert(newPerson). There's no need to explicitly call a save method. Swift Data automatically persists your data and updates the view. Like magic!
So, that's it. What do you think? How do you like Swift Data? How would you rate it compared to the good old CoreData? Feel free to share your thoughts with everyone, except me. Because I do not care.
Happy coding!
XOXO, Christian 👨🏻💻

